Quick and dirty Wireshark tutorial
Wireshark has become a very useful tool for many infosec pros. This hands-on Wireshark tutorial will acquaint you with the network sniffer’s capabilities.
Read the second part of this tutorial here.
Wireshark (earlier known as Ethereal) is one of the most popular open source network sniffer and packet/protocol analyzer solutions. It is used for troubleshooting, analysis, software and communications protocol development, as well as educational purposes. Wireshark has gained popularity because of its following features:
- Live capture, which allows sniffing data from a live network in real time.
- Support for offline protocol analysis.
- Enriched user interface (UI).
- Supports almost all network, transport and application protocols.
- Active development by enthusiasts across the globe.
- Compatibility with other products. Supports standard .pcap format which makes it compatible for use with other such tools.
Wireshark is available as a free download for UNIX/Linux, Macintosh and Microsoft Windows operating systems. Once you have downloaded the tool, it’s time to move on to the first step of our Wireshark tutorial.
Wireshark tutorial step 1: Install (Simple)
The analyzer’s UI is very simple, and there shouldn’t be any installation issues. Once installed, you can open Wireshark like other software installed on your computer from the Start menu (for Windows users), or in a similar manner for those who use Mac/Linux/Unix systems.
Wireshark tutorial step 2: Preps (Slight modifications required)
Set your browser to load a blank Web page so that unnecessary packets don’t get captured. Once you are done with this, open Wireshark to get the UI shown in the screenshot; to capture packets, the capturing interface needs to be set up. Hence, go to the Menu bar and click Capture -> Interfaces.
From here, choose the device that has an active IP address. Click on Start so that Wireshark is ready to capture any packets sent through the interface. In the Web browser, open http://www.httprecipes.com and hit Go. You will see Wireshark capturing all packets between your computer and the server. Captured communication can be analyzed in case of need for particular data. Since all packet types are captured and we are interested in examining HTTP requests as part of this Wireshark tutorial, HTTP packets should be filtered out from the rest. This can be achieved in two ways:
a) In the Filter bar, enter the type of packets to be filtered out.
Or,
b) Use the Expressions button to choose HTTP option.
Wireshark tutorial step 3: HTTP analysis (Time to dive in)
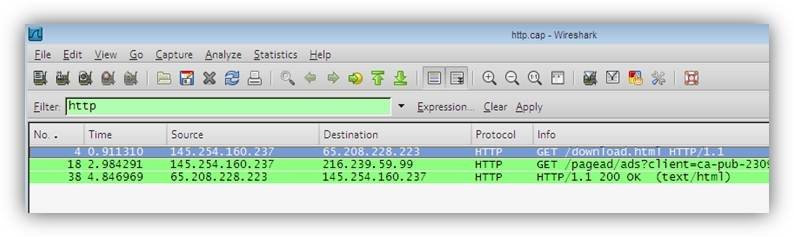
The screenshot given above shows HTTP capture filtered from the other captures. Now, let’s look at another screenshot to help you analyze the HTTP packets as part of our Wireshark tutorial.

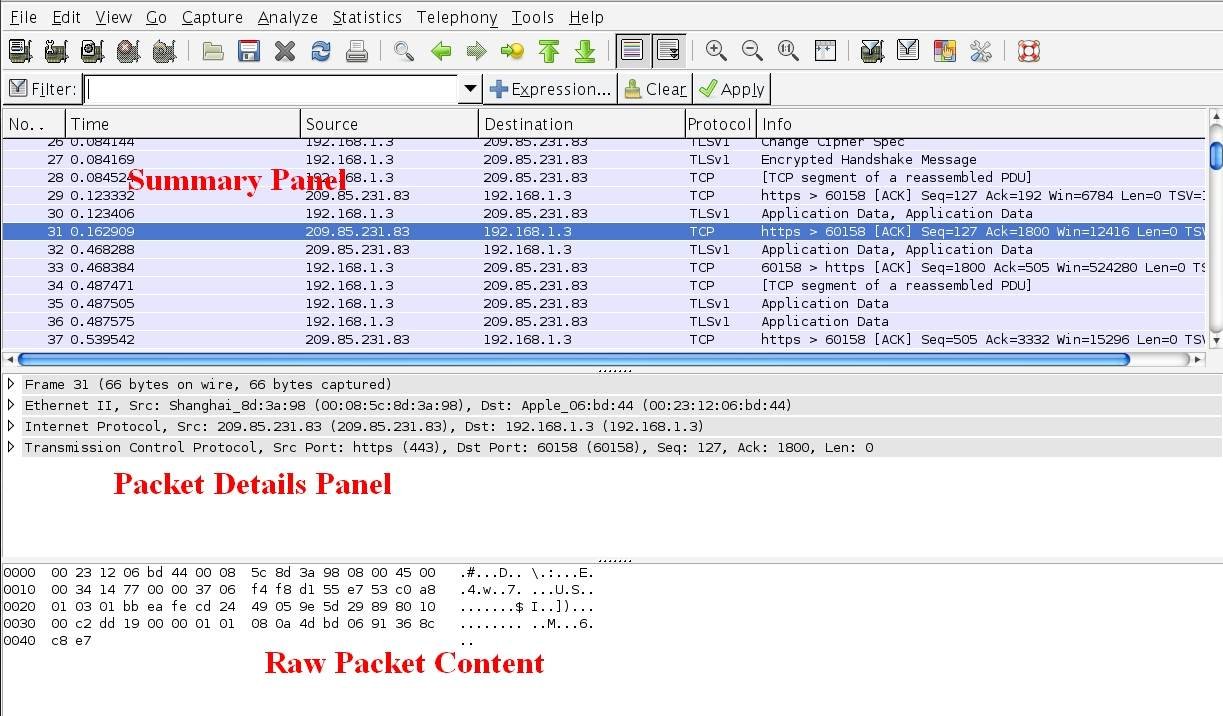
We have different sections to examine, as seen above. Wireshark segregates the relevant data following the transmission control protocol (TCP) stack principle for better understanding. Let’s understand the information that can be collected within these fields.
- Frame: This tells users the frame number, time related information regarding the packet, frame length, protocols within the frame, and the coloring rule.
- Ethernet II: Indicates the packet’s source and destination.
- Internet Protocol: Contains the source and destination information along with version, header details, and lifetime. You will find source and destination IP addresses here.
- TCP: Captures information about source and destination ports involved in the communication, next sequence number to look out for, and different flags (along with their values).
- HTTP: Contains information on the HTTP version, server info, timeout value, connection status, content type, and character set used in the communication.
- Line-based text data: This contains HTML source code (since we are analyzing the HTTP protocol).
Wireshark tutorial step 4: Grab passwords (Shades of grey?)
This section of our Wireshark tutorial graduates you to the intermediate user level. Here, we will deal with how to capture a username and password from transferred packets. In case you are wondering whether we are drifting to the dark side of things, that isn’t the case. This Wireshark tutorial is only for educational purposes.
If the username and password are not in clear text format, you might have to use few descriptors to get a readable username and password. The following part of our Wireshark tutorial presents a clear text form of packing data. Hence, there is no need of decryption tools. You can use this technique for FTP, HTTP, and other protocols, since they are in clear-text form.
- Open any Website that supports the user name and login form; enter the credentials.
- Ensure that Wireshark’s Capture mode is active and click on the Log In button.
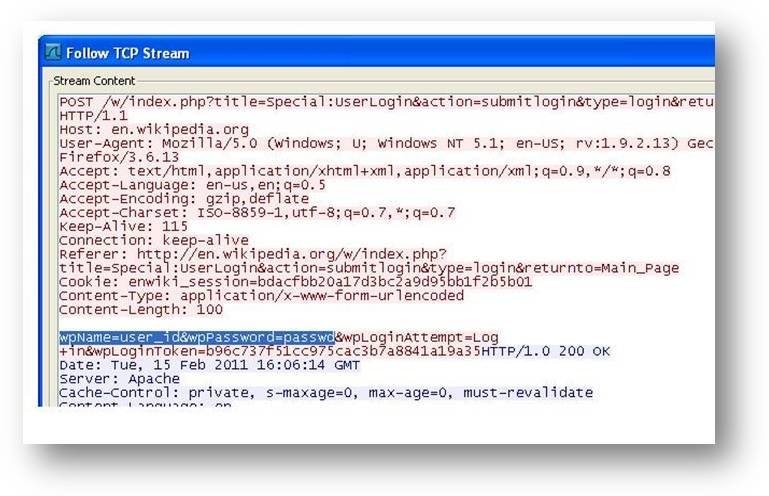
- Stop the capture of packets and search for a packet with POST method which has the following filter query: HTTP contains POST in the Filter bar.

- Right click on the packet and choose the option à Follow TCP/IP stream
- The following screenshot tells you where the details are stored.
 We hope that this Wireshark tutorial helps you understand the tool in a better way. Keep experimenting with Wireshark, since results will never be the same. A new result will lead you to explore new possibilities. Wireshark is a great tool with more capabilities than described here. So keep exploring to expand your knowledge.
Read the second part of this tutorial here.

 About the authors: Karthik R and Pramod S are members of the NULL community (www.null.co.in). Fueled by their interest in Ethical Hacking and Information security, the duo founded a startup named Raining Brains Security Solutions, focusing mainly on security issues in the cyber world. Karthik and Pramod completed their training for EC-council CEH in December 2010, and are at present pursuing their third year of B.Tech in Information Technology, from National Institute of Technology, Surathkal. Karthik and Pramod can be contacted on [email protected] and [email protected] respectively.