How to secure Macs in the enterprise
Apple computers are becoming increasingly used in the enterprise - we look at how to securely introduce Macs in the corporate network
- Accounts
- Basic security settings
- Firewall
- Disk encryption and secure backups
- Locking-down and DLP
- Anti-malware
- Keychain
- Conclusion
For many people working in IT support and security, the Mac is an ‘unknown unknown’. Headlines and word-of-mouth suggest that it is both more secure than Windows, yet just as insecure; it is harder to configure, yet easier to use; it will not fit into enterprise deployments, but does not need to.
This article is intended to introduce someone new to Macs to the basics of their security in the enterprise.
Accounts
The Mac operating system, OS X, offers two main kinds of accounts: administrator and standard. The first account you create when you set up a Mac is an administrator account and only an administrator can affect the system or other users.
It is therefore good practice to give all users standard accounts and to have a single administrator account reserved for installing software and other maintenance tasks.
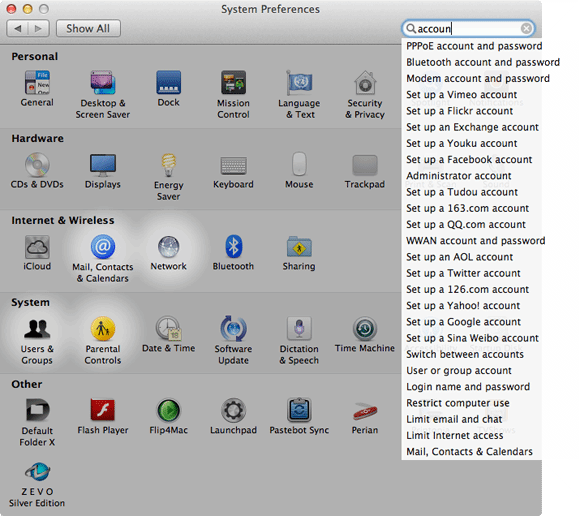
Account management is accomplished using the System Preferences application, available from the Apple menu in the top-left of the screen. Select Users & Groups from the row of system preference panes, or type "account" into the search bar at the top of the application, and OS X will highlight relevant panes.
Click + to create a new account, or click on an existing account and then check or uncheck Allow user to administer this computer to give the account the appropriate privileges.

A user can associate their Apple ID – the same ID that they would use to purchase music from iTunes, etc – with their account. Clicking Allow user to reset password using Apple ID could save on your support costs, but all it takes is for someone to guess the Apple ID’s password and they will have access to the Mac, so it is not recommended.
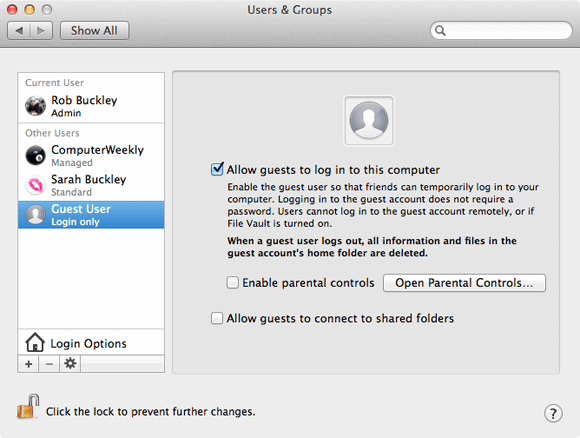
You should also use this pane to disable the Guest User by clicking on it, then unchecking Allow guests to log in to this computer.
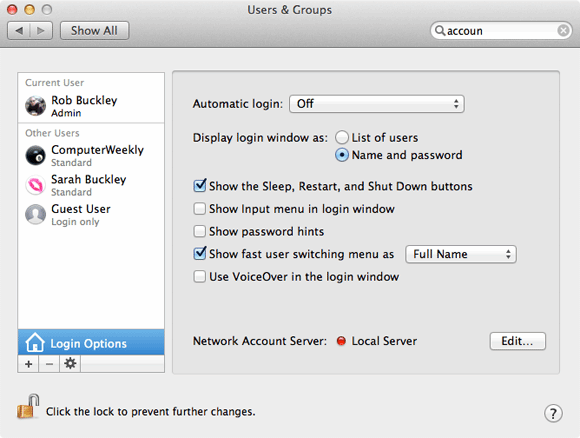
Click on Log-in Options to turn off Automatic login, so that the Mac will not log into a specific account at start up; Display the log-in window as should be set to Name and password so users have to enter both an ID and password before they can access the Mac; and turn Show password hints off.
Basic security settings
The Mac has a dedicated Security & Privacy system preferences pane. The General tab has a number of settings.
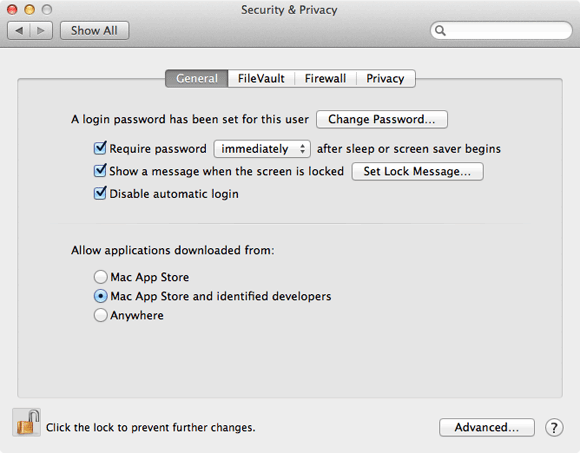
• Click Require password immediately after sleep or screen saver begins to force users to reauthenticate themselves if they’ve been away from the Mac for a set period of time.
• Show a message when screen is locked allows you to add a message, such as “If found, please call…”, to the log in screen to help with the Mac’s recovery if it is lost or to discourage people from trying to sell it.
• Disable automatic log in – as in Accounts.
• Allow applications downloaded from: allows you to prohibit the execution of any applications other than those from the Mac App Store or identified developers.
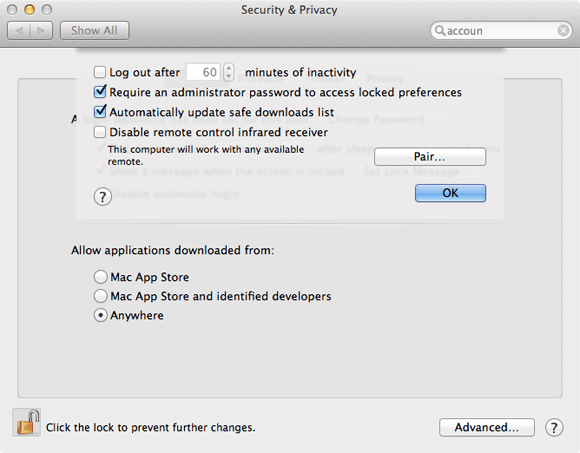
The Advanced… button offers several additional levels of security:
• Set Log out after to a reasonable period of time, depending on whether you are dealing with a desktop or a laptop, to log the user out of the Mac if it has been left unattended for too long.
• Check Require an administrator password… to stop the majority of system preferences being modified by anyone except an administrator
• Check Automatically update safe downloads list to download Apple’s list of OS X malware signatures every day, so that the Mac can recognise and warn the user if a piece of malware is downloaded.
Firewall
The Mac has a built-in firewall you can turn on by clicking Turn On Firewall in the Firewall tab of Security & Privacy.
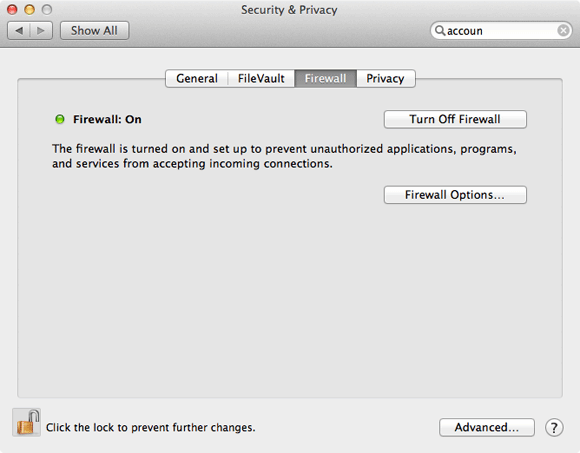
This is relatively robust and tries to strike a balance between ease of use and security. However, Firewall Options can lock down the firewall even more.
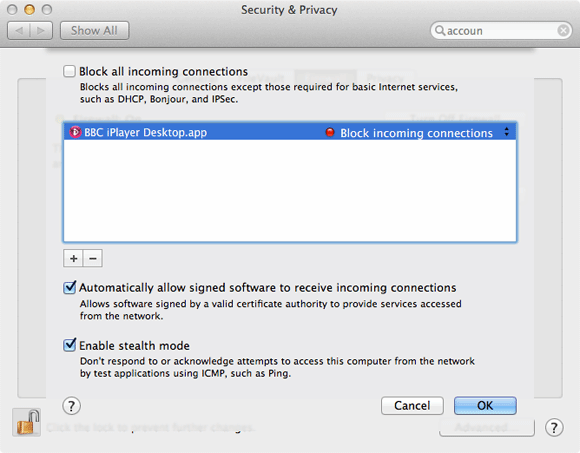
Enable stealth mode will hide the Mac from some speculative hacking traffic. Block all incoming connections should be reserved only for the least secure of Macs, since many useful services will be disabled. However, you can disable or enable incoming connections to specific applications by clicking on the + button and selecting the application whose traffic you want to control.
Disk encryption and secure backups
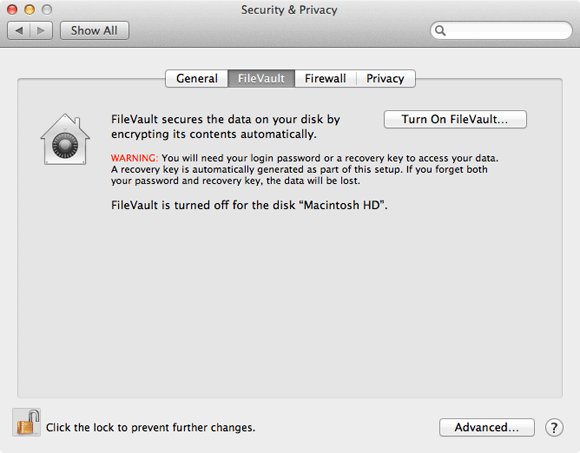
It almost goes without saying that full disk encryption should be turned on, although Apple’s implementation, FileVault, can occasionally be unreliable and will not work with certain types of disk configuration, such as RAID. It is available from the FileVault tab of the Security & Privacy system preferences pane by clicking Turn On FileVault.
Next, specify all the users who can unlock the disk – each will use their own user account password to do so – at start-up.

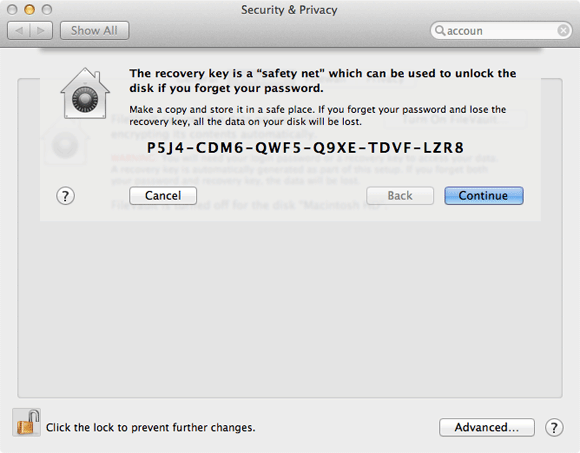
If you lose the passwords for the accounts on the Mac, you can enter the “safety net” key that OS X generates to decrypt the drive and as a final precaution you can store this key with Apple.
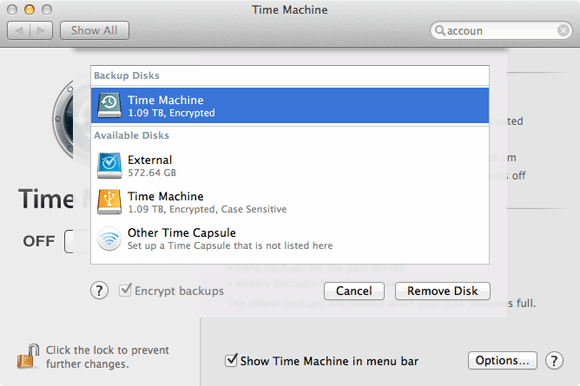
Before beginning the encryption process, you should make a copy of the Mac’s startup disk. The Mac has a built-in back-up system called “Time Machine”, accessible from “System Preferences”, that will regularly back up the main disk to any compatible network server, connected hard drive or partition that you choose.
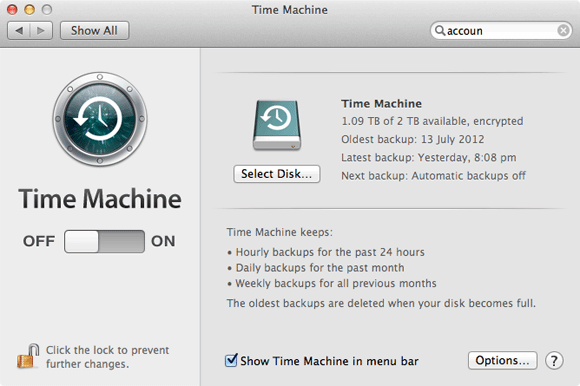
However, this does not back up every single file on the Mac so it is worth investigating programs such as Carbon Copy Cloner for imaging drives completely.
You should ensure Time Machine back-ups are encrypted by checking the “Encrypt backups” box when you first choose the destination disk.
Locking-down and DLP
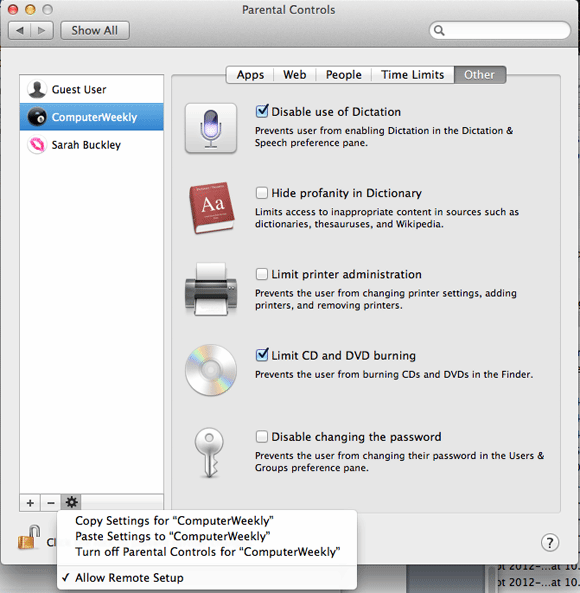
OS X has built in Parental Controls in System Preferences that can lock down certain aspects of OS X, such as the ability to change passwords, to use particular applications and more. Click Enable Parental Controls for the first account you want to lock down, then check the appropriate settings for the restrictions you want to apply.
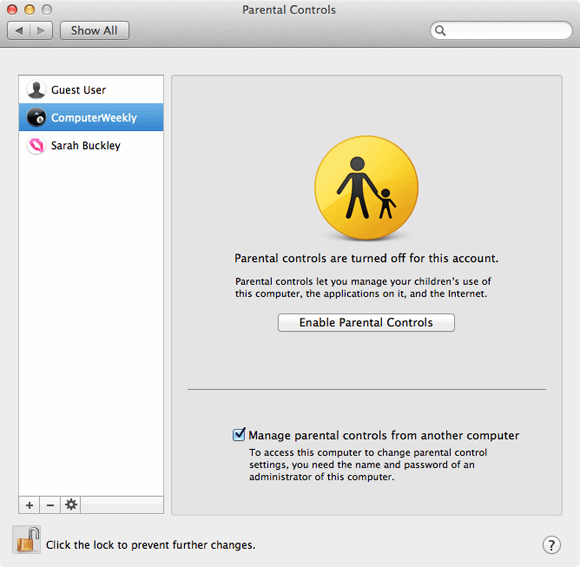
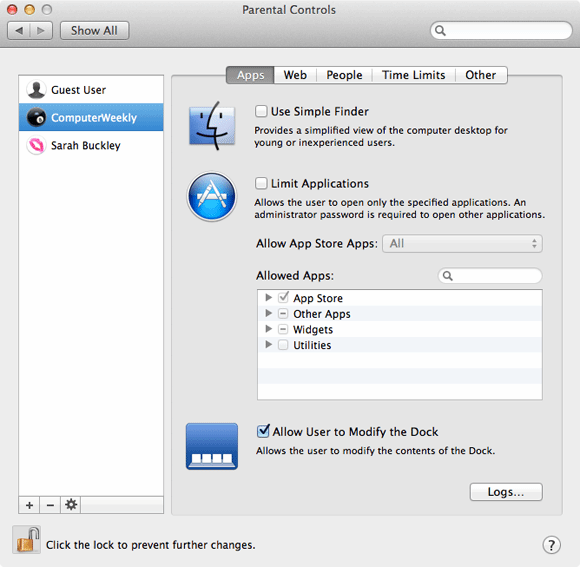
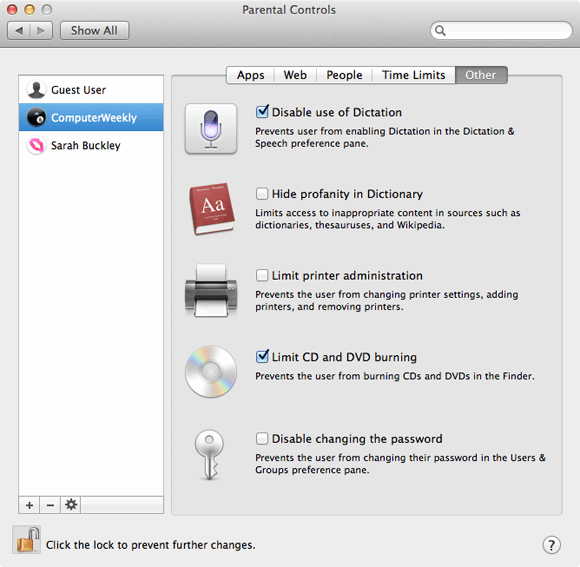
Parental Controls enables a basic form of DLP, by stopping CD burning: check Limit CD and DVD burning in the Other tab.
Greater control, including locking down of USB access, is built in, but only available through other, more advanced mechanisms, such as OS X Server, DeviceLock and Endpoint Protector.
Once you have configured the Parental Control settings for one account, they can be easily copied to other accounts using the cog button:
If you choose to allow USB drive access, you can apply FileVault encryption to removable USB drives by right-clicking on the drive on the Mac’s desktop.
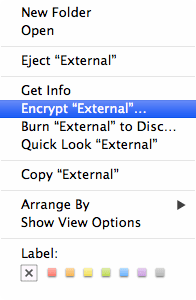
However, it is not cross-platform so if the drive is to be used by Windows as well, you should investigate encryption software such as TrueCrypt or hardware such as Kingston’s DT Locker+ G2 USB sticks that work with both platforms.
Anti-malware
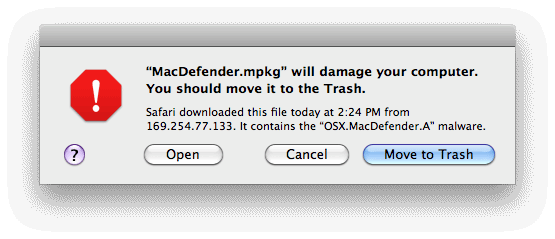
There are relatively few pieces of malware that target the Mac and most of those that do target OS X’s Java environment, which is no longer installed by default with OS X. There are frequent security updates to OS X, with all publicly known malware that targets systems blocked by the latest updates.
However, patch management remains the Mac’s security Achilles' heel, with system updates handled through the App Store in the Apple menu.
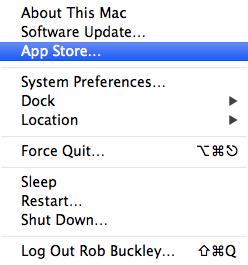
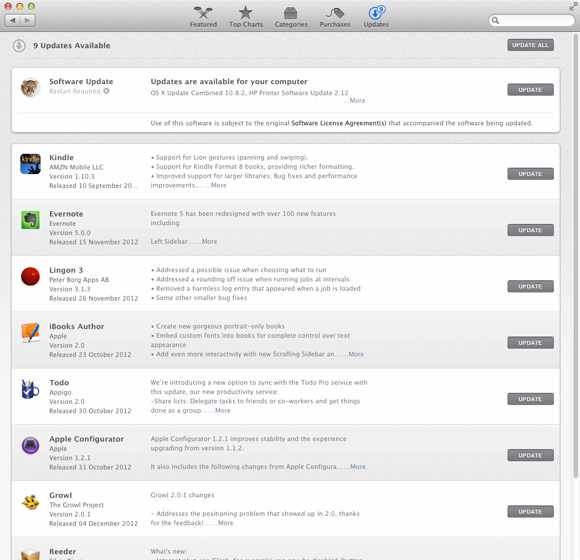
Administrator rights are needed to install the updates, so an admin needs to manually update every Mac. However, you can do this more efficiently by activating the “Remote Login” function in the “Sharing” system preference pane. Restrict access to it by clicking on the + sign and adding the administrator account to the list of users allowed to use the function.
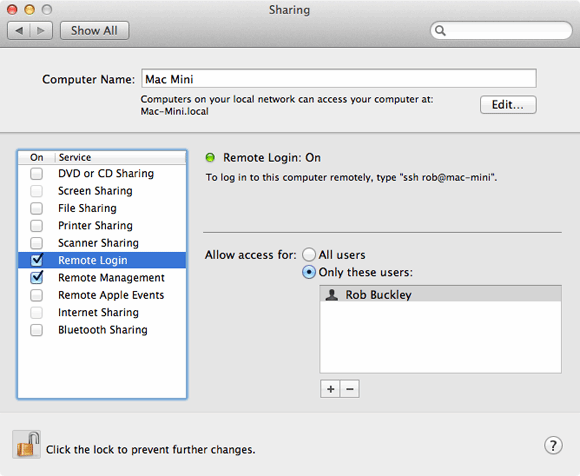

You can then use SSH to log in remotely and update the Mac with the ‘softwareupdate’ command.

However, few organisations bother to install paid-for OS updates or buy new Macs very often, so it is also worth installing AV software such as Sophos, Norton One, ESET Cybersecurity for Mac and ClamAV.
Keychain
Each user account as well as OS X itself has encrypted keychains for storing passwords, security certificates, Wi-Fi log-in details and other authentication functions. Users can store log-ins to websites in their keychain from browsers including Safari and Chrome; when they return to those sites, the browsers will automatically fill in these log-in details. The system software does the same with network authentication details.
By default, the password for the keychain is the same as the user’s account password and the user can at any point access these passwords using the Keychain Access utility in the Utilities folder in the Mac’s main Applications folder.
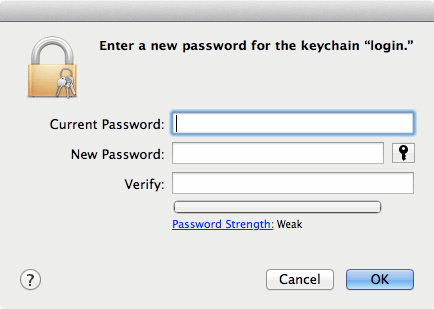
The system security certificates, Wi-Fi log-in details and so on are only available to someone with an admin account, but if someone guesses the account password, they can access all the passwords stored in the user’s keychain. To prevent this, select the log-in keychain in the Keychains panel of Keychain Access and select Change password for the keychain log in, so that it is different from the user account password.
Conclusion
There has not been enough scope here to go into depth with the full security possibilities offered through additional products, such as OS X Server, Apple Remote Desktop or Casper Suite, integration with Active Directory or options such as two-factor authentication.
However, if you follow these basics at least, your Macs should start out and remain reasonably secure.